assembly!
good tutorial good tutorial, the github version
The below is from Immersive Labs
linux 32bit
Assembly is a human-readable interpretation of machine code that uses mnemonics (symbolic references) to represent low-level instructions. In contrast to the portability of most high-level languages, each assembly language is architecture-specific.
In this series of labs, we will focus on 32-bit assembly on the Linux Operating System. The CPU only understands 0s and 1s (machine code), therefore to translate assembly that is written into machine code, an assembler and linker are needed: nasm and ld.
The popular tool nasm stands for netwide assembler and is used for assembling programs, especially in Linux. It is also used as part of the process to create a 32-bit ELF executable. An assembler takes the assembly program (.asm file extension) and creates an object file (.o file extension) that holds all of the machine code (0s and 1s) and symbols (function names, variable names, references of other object files) for an executable to then get referenced properly.
The ld tool is used to link the object file into an executable. The linker will take the object file, look at the references to the symbols, and either merge various object files together or set up the references inside the code to external code so when the executable runs, it knows where to look for that functionality.
For example, whenever we use C functions in our code, the executable needs to know where the C functions are referenced. This means whenever we link the program, the program will need to know where libc is.
Informative Alert
There is a wide range of different compilers, assemblers, and linkers out there which all create executables in slightly different ways. This means that when reverse engineering these programs, the same code can look slightly different because of all the different optimisations and processes used to create such executables.
Structures
There are two structures discussed in this lab: instructions and programs.
Instructions structure
There are two types of syntax formatting: Intel and AT&T. This series will follow the Intel syntax, which is shown below.
The majority of the assembly instructions follow the same structure of a mnemonic with zero or more operands (arguments), with most containing one or more. In the example below, mov is the mnemonic for the move instruction and is used to copy data from one location to another:
mov eax, 0x00404000
In this case, the first operand is the register EAX and the second operand is the hexadecimal value of a memory location. The memory address 0x00404000 is being copied into EAX, meaning EAX will store the value 00404000. This now means that when EAX is used, the actual data being operated on is 00404000. It can be tricky to remember what is stored in these registers, something you’ll see later on in the series when performing more reverse engineering.
There are hundreds of different instructions, of which all take different amounts of operands. The important ones are listed below, and as the series progresses, you’ll be introduced to more.
Instructions
mov
xor
cmp
jz
db
int
Program structure
There are a number of requirements that need to be fulfilled with an assembly program. Some are for nasmto know how to assemble the program, some are to ensure the executable follows the application binary interface (ABI) structure for an ELF executable, and some are for ld to know how to link the object file properly.
One of the most important aspects of an assembly program’s structure is the use of sections. This is done using the directive section inside the program. We’ll look at two sections in this lab:
- The
.textsection is used to store all the executable code the program will run. The entry point will be somewhere inside this section and is flagged by the assembler to be a readable and executable section so the code can actually be run in the CPU. - The
.datasection is used to store all initialised variables. This section is not flagged as executable but is readable and writable because variables can change values.
Labels
The next important structural addition is the use of labels, a way to reference a certain location inside an assembly program. The assembler and the linker will translate the label into a memory address inside the binary. It can be used to reference parts of code, variable names, and other such important aspects of the program.
One very important directive to include within assembly programs is the global directive, which takes a label as a parameter such as global _start. The entry point for the executable, and where the code will start to run from, is wherever the label _start is located inside the program.
The image below shows how you would go about printing Hello World to the screen and the structure of an assembly program.
The label len in the image below uses some important notations:
equ− the value at this location will be equal to the following equation$− Notation for the current memory offset in the binary
Therefore, the following len: equ $ - string means take the current memory address (using the notation $) which has been labelled len and subtract the memory location which is labelled as string. This will give you the length of the data stored at the string label.

Registers
Registers are used to store certain sized data and are designed to be very easily accessible by the central processing unit (CPU). There are a number of different registers which historically had specific jobs but have now become general purpose. The two main categories to discuss are general purpose and control registers.
General purpose registers
General purpose registers can be broken down into subcategories of data, pointer, and index registers. The registers discussed below are for a 32-bit architecture; they therefore hold up to 32 bits of data each.
The data registers are EAX, EBX, ECX, and EDX:
- EAX is normally used in any arithmetic operation
- EBX is normally used as a base register to start referring to memory addresses
- ECX is normally the counter register for looping
- EDX is normally the register used for storing data for operations
The pointer registers are EIP, EBP, and ESP:
- EIP is the instruction pointer which holds the memory address of the next instruction to be run
- EBP is the base pointer which holds the memory address of the base of the current stack frame
- ESP is the stack pointer which holds the memory address of the top of the current stack frame
The index registers are ESI and EDI:
- ESI is the source index where the memory location for the start of a string is stored for string operations
- EDI is the destination index where the memory location to store the string after it has been operated on is stored
Control registers
Lots of assembly instructions involve comparing or making mathematical calculations. The eflags register sets either a 0 or a 1 depending on the results of these comparisons or calculations. Once these results are evaluated, the program may need to jump to other branches of code (think if statements for higher level programming languages). There are 32 bits in the eflags register and each bit represents a different evaluation of the previous instruction. This series will cover many of them as they occur, but the below are particularly important for the moment:
Interrupt flag (IF) − If this is set to 1 then external interrupts like keyboard entry are to be processed. 0 means they are ignored.
Zero flag (ZF) − This shows the result of a comparison or mathematical operation. If a CMP returns a result of nonzero, it will clear the zero flag to 0. A result of 0 sets it to 1.
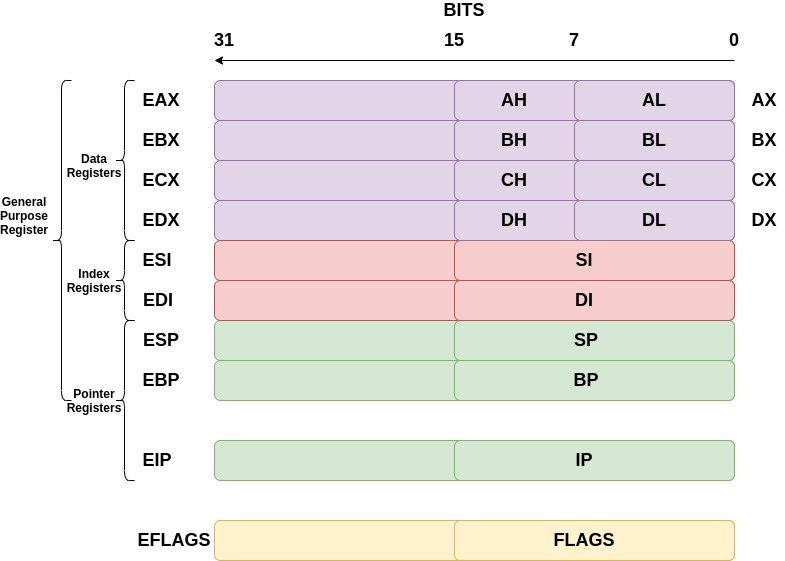
32-bit architectures
You may have been wondering what the registers for architectures were before 32-bit computers were released. The registers we use are just extended versions of the old registers, hence the ‘e’ at the beginning of each. For some registers, you can reference 16 bits and even 8 bits. For example, to reference the lower 16 bits of the EAX register, we would use AX. The diagram below demonstrates this.
Syscalls
System calls or syscalls are a way for a user-mode program to call for kernel-mode functionality. There are hundreds of syscalls that can be called from user-mode programs. Many of them are the functionality taken for granted in code, and all require different values to be stored in different registers. In order to execute a syscall, the register EAX needs to contain a value that refers to a specific syscall. For example, in 32-bit Linux, the syscall sys_write, which is used to write data to the screen, file, or anywhere else with a file descriptor (think printf in C or print in Python), is at index 4 in the system call table. Therefore, EAXwill need to contain 4 and then the instruction int 80h to signal a software interrupt.
The points below describe the process of what happens at a high level when a software interrupt for a syscall is executed:
- Assembly program executes an
INTinstruction - Control jumps to the kernel’s interrupt handler code
-
- Sees the
INTinstruction has the number 80 in hex, which means the system call functionality
- Sees the
- Register values are dumped on the kernel stack
- The value from
EAXis read and used to determine which syscall is being executed - Kernel runs the code
- Kernel returns any needed information and resumes the user mode program
Below are the registers’ values needed to use sys_write and sys_exit. You will be using these syscalls to complete this lab.
Informative Alert
Sys_write
C – Write bytes to a certain file descriptor
ssize_t write(int fd, const void *buf, size_t count)
fd – file descriptor
buf – pointer to the buffer to write
count – number of bytes to write
Return value: Number of bytes written successfully
Assembly
sys_write
EDX – number of bytes to write
ECX – pointer to the buffer to write
EBX – file descriptor, STDOUT has a value of 1
EAX – 4, the value of sys_write
Return value: EAX stores the number of bytes written successfully
Informative Alert
Sys_exit
C – Exit the program
void _exit(int status)
status – Integer status code to return to parent
Return Value: None
Assembly
sys_exit
EBX – Integer status code to return to parent
EAX – 1, the value of sys_exit
Return Value: None
exercises
In this lab you must create a program that prints the exact string I Love Assembly to the screen. The file assembly.asm is located inside the /home/iml-user directory which you will have to finish off. Use the example code shown in the information panel to help create it.
In order to create a 32-bit executable, run the command shown below:
nasm -felf32 assembly.asm && ld -m elf_i386 assembly.o
-felf32– Specifies the architecture to be 32-bit when assembled-m elf_i386– Specifies the architecture emulation to be a 32-bit ELF executable when linked
This will create an a.out file which is the default name for an executable if you do not specify an outputted filename. This file is your 32-bit executable that you can run.
To verify that it is a 32-bit executable, run the file command against the a.out file and see what the output is.
file a.out
Once you think you have successfully hit the criteria shown in the task panel, move the a.out file into the /home/iml-user/verify/ directory. If you have done this successfully, the token will print to your console.
-
Edit the file
/home/iml-user/assembly.asmand follow the specific tasks to print the stringI Love Assemblyto the screen -
2Run the command
nasm -felf32 assembly.asm && ld -m elf_i386 assembly.oto create thea.outfile -
3Move the
a.outfile into the directory/home/iml-user/verify/. If you pass, it will return thea.outfile and give you a token. If you fail, it will return thea.outfile and tell you what is required. In order to pass the verification test, your executable will need to be: -
- A 32-bit executable
- Called
a.out - Have a
.textsection and a.datasection - Contain the exact, case-sensitive string
I Love Assembly
-
4What is the token for creating the correct executable?
Correct file:
mov ecx, string ;Task Move the string to the register ecx
mov ebx, 1 ;Task: Move the numerical representation of stdout to the register ebx
mov eax, 4 ;Task: Move the 32 bit sys_write system call number to the register eax
int 80h ;This creates the interrupt to tell the operating system to transition to Kernel Mode```
cmp eax, 0 ; This checks how many bytes were printed, if it is 0 then we know sys_write failed
jz _start ;If it is 0 then jump back to the address labelled at ‘_start’ to execute code from there
exit: xor ebx, ebx ;Task: XOR the register ebx to make the exit code ‘0’ to indicate the program ran successfully
mov EAX, 1 ;Task: Move the sys_exit system call number to the register eax
int 80h
section .data ;Task: Declare the .data section
string: db “I Love Assembly”, 0x0a ;Task: Enter the string ‘I Love Assembly’ followed by a new line character
len: equ $ - string ;Task: Use the current memory location - string to work out the length of the string to print
~
This is the second episode of the 32-bit assembly series. We will solidify some of the knowledge discussed in the previous episode and build upon it in this episode, covering how to use various file-related syscalls. This is important because virtually everything is considered a file in Linux. Therefore, we need to understand how to manipulate files and file descriptors. We will also look at a new way to reference memory using memory operands and introduce a new section to our executable.
Registers
Another important aspect of registers is the use of smaller versions of the 32-bit registers. To access the lowest 8 bits of the EBX register, only use BL. For example, to move 0x32 into BL, the instruction would be:
mov bl, 0x32
The first episode on 32-bit architecture contained information on registers too, however it is important to remember how these registers can be broken down. Familiarise yourself with the diagram below to recap.

Memory operands
The previous episode showed how to copy a number or hexadecimal digit to a register. However, there are other places data can be copied to and from. There are three main types of operands: register operand, memory operand, and immediate operand.
Operands are referenced in slightly different ways. This will become clear when doing the practical task in this lab.
Memory operands
Memory operands are used when trying to reference data that is stored in memory, not a register or as an immediate value which is baked into the instruction itself. When an instruction with a memory operand gets executed, the CPU will fetch the data from the memory location specified in the memory operand. There are a number of different ways to reference data in order for the instruction to know it is a memory operand. All use the square brackets [<register_or_location>], which indicates getting the value located at the address being referenced.
For example, say the memory address location 0x00408000 stores a value of 0x54. To actually use that data, there are a number of ways it can be referenced:
mov ebx, [0x00408000] ; Copy the value 0x54 into EBX
mov ebx, [eax] ; if EAX stores the value 0x00408000, 0x54 will be copied into EBX
mov ebx, [value] ; if the ‘value’ label references the location 0x00408000, the value 0x54 will be copied into EBX
Memory operands can also be used as the destination, for example:
mov [eax], 0x55 ; Copy the immediate value 0x55 into the address located in eax (e.g. 0x00408000) therefore instead of containing the value 0x54, the value inside 0x00408000 is now 0x55
Immediate operands
Immediate operands are values that will get baked into an instruction by the assembler. When disassembled, you will see the exact value written from the source code. The value is simply either decimal, octal, hexadecimal, or binary. There are many ways to write each of these types of immediate operands. Below are a few examples:
- Decimal –
30 - Decimal –
30d - Hexadecimal –
0x42 - Hexadecimal –
42h - Octal –
70o - Octal –
70q - Binary –
10011000b - Binary –
0b10011000
Simply reference these operands as listed above. Here are some examples:
add eax, 30 ; Add 30 decimal to the value stored in EAX
cmp al, 31h ; Compare the lowest 8 bits of EAX to the hexadecimal value 31 which is ‘1’ in the ascii table
mov ecx, 10011000b ; Copy the binary 10011000 into ECX which ‘152’ in decimal
Note: You cannot have an immediate operand as the destination.
Register operands
Register operands are exactly as their name suggests. They use a value inside registers to operate on with instructions. For example:
add eax, ebx ; Add whatever is inside EBX to EAX
cmp eax, ecx ; Compare whatever is inside ECX and EAX to check if they are the same
mov edx, ebx ; Copy data from EBX to EDX
Informative Alert
Note
Besides a few selected instructions, a memory operand cannot be both a source operand and a destination operand. This is a limitation of the x86 architecture. However, with certain instructions such as string processing, this is possible. For the majority of the time, the combinations of possible operands are as follows:
add
cmp
mov
xor
add
The .bss section
The previous episode covered the .text and the .data section. In this lab, we’ll look at the Block Started by Symbol (.bss) section. The .bss section is similar to the .data section in that it is a place to store variables. However, while the .data section stores initialised variables, the .bss stores variables that are uninitialised. Like the .data section, the .bss section will be given writable access but not executable.
When creating an object file using an assembler, the .bss section does not store data, but the length of how much data is to be stored there. The program loader in the Operating System will allocate the correct amount of space in memory when the executable is loaded from the file system to RAM. This saves space inside the executable when it is not loaded into memory.
For example, say you have 100 uninitialised variables of size int (32 bits). You will have an executable with 3200 bits of nothing, whereas the number 3200 is actually stored to dictate how much space is required.
The key instructions to reserve space and not initialise the variable in the .bss section are shown below. These cannot be used in the .text section.
Section .bss
number: resb 4 ; Reserve 4 bytes
word: resw 1 ; Reserve 1 word(16 bits)
doubleword: resd 1 ; Reserve 1 dword(32 bits)
The number label would be the same as entering the following in C:
int number;
Syscalls
This program uses syscalls. The previous episode looked at how to use syscalls to write things to the screen. In this episode, we’ll discuss how to take input from a keyboard with the system call sys_read.
Below is an example of the sys_read command followed by a code snippet of printing a question to the screen then reading an input.
There is also some comparing code in here to check if the number entered by the user is actually between 1 and 9. You will need this for the practical exercise.
Informative Alert
Sys_read
C - Read bytes from a certain file descriptor
ssize_t read(int fd, void *buf, size_t count)
fd – File descriptor, 0 for STDIN (keyboard input)
buf – Pointer to the buffer to fill with read contents
count – Number of bytes to read
Return value: Number of bytes read
Assembly
sys_read
EDX – Number of bytes to read
ECX – Pointer to the buffer to fill with read contents
EBX – File descriptor, 0 for STDIN (keyboard input)
EAX – 3, the value of sys_read
Return value: Number of bytes read returned in the register EAX
Writing and Reading Data
OtherCode:
………………………
Output: ; sys_write implementation
mov edx, len
mov ecx, string
mov ebx, 1
mov eax, 4
int 80h
cmp eax, 0
jz exit
input: ; sys_read implementation
mov edx, 1   ; Number of bytes to be read (should match how many bytes are reserved)
mov ecx, number    ; Copy the label into ecx, this is located in the .bss section below
mov ebx, 0   ; Copy the value for STDIN into ebx
mov eax, 3   ; Copy the value of sys_read into eax
int 80h
mov ebx, [ecx]   ; Copy the VALUE contained in the memory address of ecx into ebx
checks: ; This is code for checking if the number value inside [ecx] is between 1 and 9
cmp bl, 31h ; Compare the lowest 8 bits of the register ebx with 31h which is ‘1’ in ascii
jb input ; Jump if the comparison comes back that the number is below ‘1’ in the ascii table
cmp bl, 39h ; Compare the lowest 8 bits of the register ebx with 39h which is ‘9’ in ascii
ja input ; Jump if the comparison comes back that the number is above ‘9’ in the ascii table
mov [number], ebx ; Copy the value in ebx into the location of number in the .bss section
MoreCode:
…………………
Section .data
string: db “Enter a number between 1 and 9: ”, 0x0a
len: equ $ - string
Section .bss
number: resb 1 ; Reserve 1 byte at the label number in the .bss section
Checks
You may notice that there is a label called checks in the previous code dump. This code is all about checking if the inputted number from the user is between 1 and 9. Remember that in memory, data is stored as 0s and 1s and is inputted via ASCII from the keyboard unless explicitly stored as Unicode. Therefore when operating on the data, be mindful that if the number 5 has been input into memory, it isn’t 00000101 that gets stored, it is the ASCII representation of 5 that gets stored, 00110101.
These checks make sure that the ASCII number is above the ASCII representation of 1 (0x31) and below the ASCII representation of 9 (0x39). This also shows you how to reference the lower 8 bits of a register when doing these sorts of comparisons.
Syscalls
This lab will also show you how to implement sys_write to write bytes to a file, sys_creat, and sys_close. All are shown below from a C and assembly perspective. Sys_write will need to be changed to use the file descriptor of the return from sys_creat. sys_creat is sort of a redundant function because sys_open will also call sys_creat, but we will use it here.
Informative Alert
Sys_creat
C – Create a file given the filename path with certain restrictions
int creat(const char *path, mode_t mode);
*path – Pointer to the pathname of the file to be created
mode – The permissions given to the file e.g. 644
Return value: File descriptor of the created file
Assembly
sys_creat
ECX – The permissions given to the file e.g. 644
EBX – Pointer to the pathname of the file to be created
EAX – 8 - the value of sys_creat
Return value: File descriptor of the created file located in the register EAX
Informative Alert
Sys_close
C – Close the file descriptor and therefore access to the file
int close(int fd)
fd – File descriptor to close the correct file
Return value: 0 for success
Assembly
sys_close
EBX – File descriptor to close the correct file
EAX – 6, the value of sys_close
Return value: 0 for success located in the register EAX
All together
System calls are often used in conjunction with each other to manipulate files. Let’s say that we need to create a file and write something to it. It is important to make sure the file descriptor is closed to ensure that memory is freed up for other things and to alleviate any security issues involved with keeping files open for longer than necessary. Always close the handle to files that you aren’t using anymore.
The code snippet below will create a file, write to it, and then close it. The strings needed will be held in the .data and .bss sections. Labels with the . notation in front of it such as .writefile and .closefileare local and are not included in the object file’s symbol table.
File Manipulation Code
EarlierCode: ; Other code to do other things
…………
FileManipulation: ; Label for File Manipulation code
.createfile:
mov ecx, 0777o ; Copy the permissions to ecx for the file. This is the same as rwx for everyone.
mov ebx, filename ; Copy the label related to the filename into ebx
mov eax, 8 ; Copy the syscall number for sys_creat into eax
int 80h
mov [fd], eax ; Copy the file descriptor into the VALUE located at the label fd. fd is located in the .bss section
.writefile:
mov edx, 1 ; Copy the size of the string to write to the file into edx
mov ecx, number ; Copy the number label from the .bss section into
mov ebx, [fd]
mov eax, 4
int 80h
.closefile:
mov ebx, [fd]
mov eax, 6
int 80h
MoreCode: ; The rest of the code goes here
………
Section .data
filename: db “File.txt”, 0x00 ; Store the filename in the .data section with a null terminator at the end
number: db “9” ; Store the value “9” in the .data section
Section .bss
fd: resb 1 ; Reserve a byte in the label fd for file descriptor
In this lab
In this lab you must create a program that prints a number to a file. The number is inputted by the user, and must be between 1 and 9. The file assembly.asm is located inside the /home/iml-user directory which you will have to finish off. Use the example code shown in the information panel to help create it.
In order to create a 32-bit executable, run this command:
nasm -felf32 assembly.asm && ld -m elf_i386 assembly.o
-felf32– Specifies the architecture to be 32-bit when assembled-m elf_i386– Specifies the architecture emulation to be a 32-bit ELF executable when linked
This will create an a.out file which is the default name for an executable, providing you do not specify an outputted filename. This file is your 32-bit executable that you can run.
To verify it is a 32-bit executable, run the file command against the a.out file and see what the output is.
file a.out
Once you think you have successfully hit the criteria shown in the task panel, move the a.out file into the /home/iml-user/verify/ directory. If you have done this successfully, the token will print to your console.